Adding an awning to your mobile home or RV is one of the smartest upgrades you can make. It instantly creates a comfortable, shaded outdoor room, protects your siding and windows from harsh sun, and can even help with energy efficiency. But let’s be honest, the installation process can feel daunting if you’ve never done it before. The good news is that with the right planning, tools, and knowledge, it’s a very achievable project for a confident DIYer. I’ve installed hundreds of these systems over the years, and I’m here to guide you through everything you need to know, from choosing the best awning material to the final bolt tightening, ensuring you get a professional, durable result that will last for years.
Why Polycarbonate is the Ideal Choice for Mobile Structures
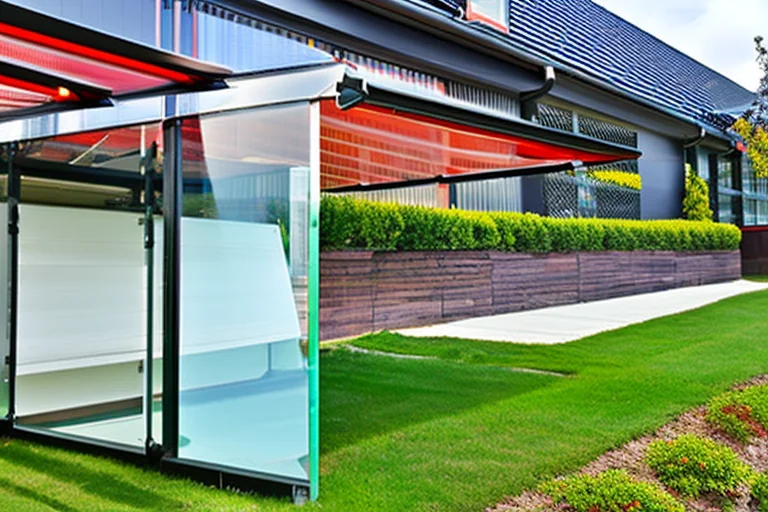
When selecting an awning for a mobile home or RV, the material is your first and most critical decision. You need something tough, lightweight, and able to withstand constant exposure while you’re on the move or parked long-term. This is where polycarbonate panels truly shine. Unlike traditional fabrics that can fade, mildew, and tear, multi-wall polycarbonate is virtually unbreakable. It’s the same material used for greenhouse panels and riot shields, which tells you a lot about its durability. It stands up to hail, heavy rain, and UV radiation without yellowing or becoming brittle. For an RV, the lightweight nature is a huge bonus, not adding significant weight to your rig. For a mobile home, its strength means it can handle snow load and high winds much better than many alternatives. The panels also provide excellent diffused light, creating a bright but shaded space without the harsh glare you get under a solid roof.
Planning and Measuring: The Foundation of Success
Rushing the planning stage is the number one cause of installation headaches. Before you even look at products, grab your tape measure and notepad. For a mobile home, you need to determine the exact length you want the awning to cover. Standard sizes often align with window or door spans. More importantly, you must identify what you’re mounting to. Is there a sturdy, continuous gutter? Do you have solid wood fascia boards behind the siding? The integrity of your mounting surface is everything. For RVs, you’re often working with manufacturer-provided awning rails, but adding a fixed patio awning requires careful consideration of the vehicle’s sidewall structure. Always check for underlying framing members—you must hit studs or solid backing, not just vinyl siding or aluminum sheeting. A crucial step many overlook is checking for level. Mobile home roofs and RV sides are rarely perfectly level or straight. You’ll need to account for this during installation to ensure proper water runoff and a visually straight awning.
Choosing Your Mounting Method
The mounting method is dictated by your structure. For mobile homes with existing gutters, a gutter-mount system is often the simplest and strongest approach. These systems use specialized brackets that clamp securely onto the gutter, distributing weight evenly and avoiding the need to penetrate the home’s siding or roof membrane. It’s a clean, reliable method. If you don’t have gutters or prefer a different look, a wall-mount or fascia-mount system is used. This requires attaching a header board or aluminum rail directly to the wall studs or fascia. This method is more invasive but allows for placement flexibility. For RVs, besides the common roll-out fabric awnings, many owners opt for fixed aluminum-framed patio covers that attach to the side of the vehicle, creating a permanent outdoor living space at their home base. The key is matching the hardware to your specific structure’s capabilities.
Step-by-Step Installation Overview
While every kit and situation is unique, the general process follows a logical sequence. First, assemble all components on the ground according to the manufacturer’s instructions. This usually involves connecting the aluminum rafters to the header beam and fitting the polycarbonate panels into the channels. Next, with a helper (or two!), lift the entire assembled frame into place against the mounting surface. Do not fully secure it yet. Use temporary braces or supports to hold it. Now, meticulously check for level along the header. Because your home may not be level, you’ll often need to “scribe” the installation, meaning you adjust the brackets so the awning itself hangs level, even if the mounting point is not. This ensures water drains off the panels correctly. Once level, mark your drill holes for the mounting brackets. Drill pilot holes and secure the brackets with the appropriate lag bolts or screws, ensuring every one hits solid wood or structural metal. Finally, make the final attachments, install any side panels or closures, and seal all penetrations with a high-quality exterior sealant.
Essential Tools and Safety Tips
You’ll need a standard set of tools: a reliable drill/driver, measuring tape, level (a 4-foot level is ideal), wrench set, ladder, and safety gear. A cordless impact driver can be invaluable for driving long lag bolts. The most critical safety tip is to never work alone. An awning frame, even without panels, is awkward and heavy. Use properly rated ladders on stable ground, and secure them if possible. When drilling into your mobile home or RV, be hyper-aware of hidden wiring, plumbing, or propane lines. Use a stud finder and know what’s behind the wall. Always wear safety glasses when cutting or drilling metal or polycarbonate.
Long-Term Maintenance and Care
One of the great advantages of a polycarbonate awning is its low maintenance. However, “low” doesn’t mean “none.” To keep it looking and performing its best, give it a gentle wash with mild soap and water once or twice a year to remove dirt, pollen, and organic debris. Avoid abrasive cleaners or brushes that could scratch the panels. Inspect the mounting hardware annually. Tighten any bolts that may have loosened due to thermal expansion and contraction or vibration from wind. Check the condition of the sealant around brackets and reapply if you see cracks or gaps. For RVs that travel, a quick visual inspection of all connections before hitting the road is a good habit. Proper care will ensure your investment provides shade and enjoyment for a decade or more.
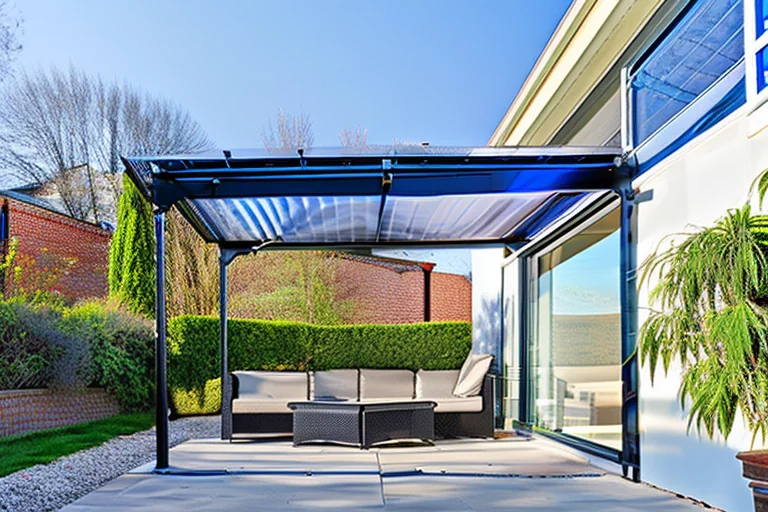
Enhancing Your Outdoor Living Space
Once your awning is securely installed, the real fun begins—creating your outdoor oasis. This new shaded area is perfect for a patio set, a grill, or container gardens. For added privacy and wind protection, consider installing removable side panels or screens. Lighting can be easily added under the frame for evening enjoyment. Think of your awning not just as a sunshade, but as an extension of your home’s living area. It adds functional square footage and significantly boosts your curb appeal and enjoyment, whether you’re hosting a barbecue at your mobile home park or relaxing at a scenic RV campground.
Ready to stop dreaming about that perfect shaded spot and start building it? You now have the foundational knowledge to plan a successful project. For the next step, we invite you to browse our complete polycarbonate awning collection designed specifically for durable, beautiful installations on mobile homes and RVs. Have specific questions about your setup? Don’t hesitate to contact our awning experts today for personalized advice and support. Let’s get you covered.